How to Reset MySQL root password in Ubuntu 18.04
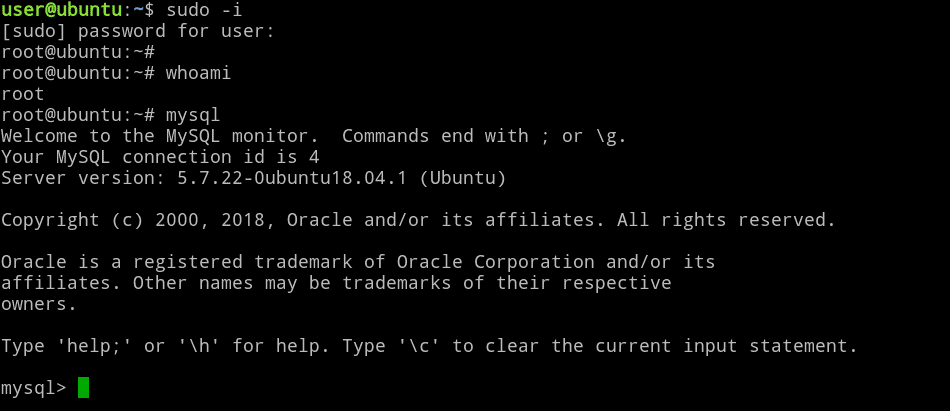
We will not be prompted to set a root user password when installing MySQL on Ubuntu 18.04, Therefore MySQL root user created with an empty password. But the root system user can log in to the MySQL root console without a password.
MySQL server on Ubuntu 18.04 use Unix Socket plugin to authenticate MySQL root user by default. Unix socket also known as auth_socket authentication plugin authenticates the user using the OS credential. Which means a user can only log in If the operating system user name matches the MySQL user name specified by the client.
If you have already login to the Ubuntu root user account, then you can login to mysql root account without a password.

This also means that we cannot login to the MySQL root console from a regular Linux user. For example, The Linux user Greg cannot login to the MySQL root using the mysql client.
$ whoami
greg
$ mysql -u root
ERROR 1698 (28000): Access denied for user 'root'@'localhost'
However, If the user Greg has sudo privileges, then he can run the mysql command with sudo and log in to the Ubuntu mysql root without a password.
sudo mysqlSo, from a security standpoint, this is a good implementation because now there is no mysql root access outside the root account of the Ubuntu Linux system.
But for some reason, if you want to set a password to the mysql root, then login to the MySQL console from the root system account and run the following command:
ALTER USER 'root'@'localhost' IDENTIFIED WITH mysql_native_password BY 'new-password';Note: here new-password is the root password, replace it with a strong one.
From now on you need to enter password to log in as mysql root and any system user can login to root account if they know the password.
mysql -u root -pNote that, this guide may not work for MariaDB Server, For MariaDB guide click on this link.
Resetting the MySQL root password If you forget the password
What if your MySQL root already has a password and you forget it. In that case you have to reset MySQL root password, There are a couple of ways we can do this on Ubuntu 18.04.
The easiest and quickest method is to log in to MySQL server as debian-sys-maint and change root password. Another method is to use "--skip-grant-tables" method.
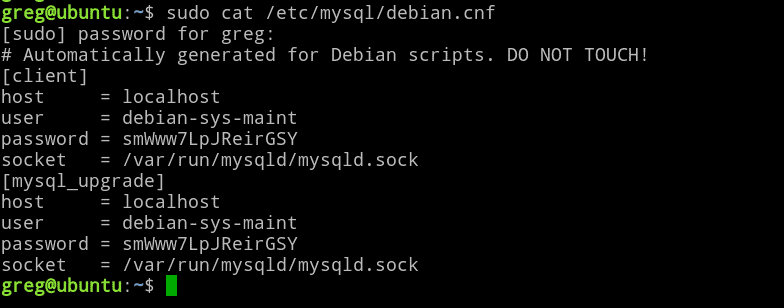
The debian-sys-maint user account is an administrative user account automatically created when installing MySQL Server on Ubuntu and this user have full access to all databases.
The /etc/mysql/debian.cnf configuration file contains the MysQL password for the debian-sys-maint account on your Ubuntu server.

You can use these credentials to log in to the Ubuntu MySQL server.
To reset mysql root password, first login to the MySQL console as the debian-sys-maint user:
sudo mysql --defaults-file=/etc/mysql/debian.cnfRun the ALTER USER command as follows to change mysql root password:
ALTER USER 'root'@'localhost' IDENTIFIED WITH mysql_native_password BY 'new-password';Now you should be able to log in to the root console with the new password.
As you can see resetting the MySQL root password using debian-sys-maint user is very simple and straightforward. But just in case it does not work for you, there another way to change root password using the --skip-grant-tables.
Using --skip-grant-tables
In the --skip-grant-tables method, first we stop the MySQL server and start the server with --skip-grant-tables option which allow us to log in to root console without a password. Then we log in to the root console and change the password. So here how it is done.
Stop the MySQL server:
sudo systemctl stop mysql.serviceCreate /var/run/mysqld/ directory:
sudo mkdir -p /var/run/mysqld/
sudo chown mysql:mysql /var/run/mysqld/
sudo chmod 755 /var/run/mysqld/
Start MySQL server, only this time using the mysqld command with --skip-grant-tables option:
sudo mysqld --skip-grant-tables &Login to the MySQL console by simply issuing the mysql command:
mysqlRun FLUSH PRIVILEGES to reload the grants and Use the ALTER USER command to reset the password of the root user:
FLUSH PRIVILEGES;
ALTER USER 'root'@'localhost' IDENTIFIED WITH mysql_native_password BY 'newpass';
Exit from the MySQL console, kill the mysqld process and start mysql using the systemctl command:
sudo pkill mysqld
sudo systemctl start mysql.service
Now you should be able to connect to MySQL root on Ubuntu with the new password.
The --skip-grant-tables start the MySQL server without a password for all users and that is why we were able to login without providing a password.
Summary
In this tutorial we learned how to reset mysql root password in Ubuntu 18.04 bionic beaver. MySQL server on Ubuntu 18.04 use Unix Socket plugin for authentication by default and therefore only the Ubuntu root user can access the mysql root account.
We can set a new Password by changing the authentication method to mysql_native_password.
If you forget the password, you can log in as debian-sys-maint user and change the password or use the --skip-grant-tables method.
What Next? In the next tutorial we are going to learn how to enable MySQL remote login on Ubuntu Server 18.04.