How to Upgrade Ubuntu 16.04 to 18.04 LTS
The newest Ubuntu LTS version Ubuntu 18.04 has been released, now it is time to upgrade your Ubuntu 16.04 system to 18.04 LTS. This tutorial explains how to upgrade Ubuntu 16.04 to 18.04 in both Ubuntu server and desktop.
Prior to the upgrade
Backup Important Files - The upgrade has been tested and work without any problem, But don't take anything for granted. You should backup most important files and folders as well as databases if you're running a database server.
Upgrade from Ubuntu 14.04 LTS - You cannot directly Upgrade from 14.04 to 18.04. First, you need to upgrade your Ubuntu 14.04 system to 16.04 using the same steps described below.
The upgrade method - For Ubuntu server, It is possible to run the upgrade over SSH session, but it is not recommended. Run the upgrade process directly from the physical console (or virtual console in a virtualized environment) whenever possible.
If you don't have direct access to the your Ubuntu system, you can still run the update over an SSH session.
The command line method describes bellow works for Both Ubuntu Server and Desktop, But, Desktop users can perform the upgrade using the software center, if you are not familiar with Ubuntu command line.
How to Do It…
Open the Ubuntu terminal and do the following steps to upgrade Ubuntu 16.04 to 18.04 LTS:
-
Update the Ubuntu package index. From the command line, run:
sudo apt-get update -
Upgrade packages to the latest version:
sudo apt-get dist-upgradeBefore upgrade Ubuntu, it is recommended to upgrade all installed packages to the newest version. The dist-upgrade command will update all install packages to the latest release with correct dependencies and remove unwanted packages.
-
Run the do-release-upgrade command:
sudo do-release-upgrade
If you are running under SSH session, you will notify that additional SSH daemon will start at port '1022' (Press y and Enter to continue).

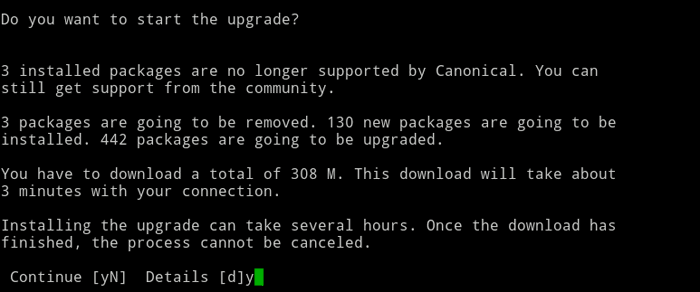
Before upgrade to Ubuntu 18.04, the command will check whether a new Ubuntu LTS version is available and will gather all information it needs. Then you will be asked for the confirmation before the actual upgrade process begins.

Answer y and enter to start the process. This is a very lengthy process could take several hours to complete depends on your internet connection.
At the end of the process, you will be asked to remove packages that are no longer required. Answer y and press enter to remove obsolete packages.
To finish the update process, reboot the system.
Once it has rebooted, run the lsb_release command to check the Ubuntu version:
lsb_release -aThe command output should confirm that you are running Ubuntu 18.04 LTS.
Distributor ID:	Ubuntu
Description:	Ubuntu 18.04 LTS
Release:	18.04
Codename:	bionic
Troubleshooting: No new release found
If you get following message "No new release found", this is because the new LTS version has not been released yet. But you can still update to the development version with -d option.
sudo do-release-upgrade -dUpgrade Ubuntu 17.04 to 18.04
The do-release-upgrade command by default, only upgrade the system from LTS release to LTS release only. Since Ubuntu 17 is not LTS version, You need to set Prompt=normal in the /etc/update-manager/release-upgrades file.
Prompt=normalThis allows do-release-upgrade command to update your Ubuntu system from 17.04 to 18.04 LTS.
Gnome Desktop vs Unity Desktop
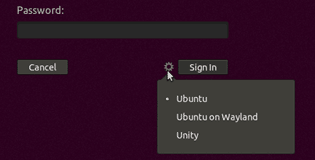
Ubuntu 18 desktop version by default comes with the Gnome desktop environment, But the upgraded version will have both gnome and unity desktop.

At the login screen you may select the desktop environment you want to use.